Beginner's Guide to Getting Started with Red Worms
Well I just had a couple cups of coffee so lets see if I can type without rambling to much. I tend to get real jittery.
In this blog I am going to teach how to set up a “worm bin.” Anyone can learn how to do this and its great fun for children so have them help also.
This is intended for the beginner starting with common red worms.

First thing you will need is a home for the worms. This can be a bucket, a plastic “rubbermaid®” box, a used aluminum foil turkey pan or any other sort of container that will not get soft when exposed to water. If you do not have anything like this you can just go and buy a rubbermaid container.
Once you pick out a home for the worms you need to add “bedding” to it.
What is bedding? Bedding is the stuff the worms live in.
- Shredded paper
- shredded cardboard
- peat moss
- dead leaves
- old compost
- aged manure (do not used fresh manure for bedding)
- coconut coir
- Dirt / soil from the yard is NOT bedding. Adding a little is ok but no more than a hand-full
- Mixing several different types of bedding together is fine and great
The bedding needs to be damp. Get a container and put some water in it. Then take a hand-full of your bedding and place it in the water letting it soak for a few seconds. Then squeeze out the excess water just like you were squeezing out a sponge. That is all that is needed to dampen the bedding.
Now take that hand-full of damp bedding and place it into the bottom of the worm home. Repeat this until you have about 4 inches of bedding in the bottom. You are now done adding bedding.
Just an interesting note here that worms can live in damp bedding alone. The problem being a lack of food so overtime they would not multiply or grow much.
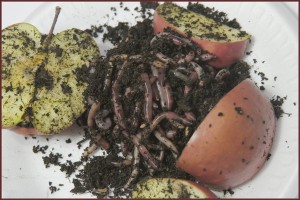
Next step is to add a small amount of food by placing it on top of the bedding. Small amount means about a cup full.
An optional step is to cover this food with a little bedding to keep flies and smells away.
- What is food? Worms are not picky eaters so just about any fruit, vegetable, nut or bean will work. This includes coffee and filters, egg shells, bread, and even meat and cheese. The problem from meat and cheese is that they can stink like crazy so don’t add them unless you want stinky worms.
You are now done preparing the worm’s home. Any worm would be happy and cozy in there.

Now to add the worms just place them on top of the bedding. It may take them a day or two to move into their new home because they need a little time to adjust to the new conditions. Think of it kind of like when you get fish for an aquarium, it is best to let them adjust slowly to the new conditions.
After two days they should be settled into their new homes. In another day or two you should see some worms gathered around the food that you added. This is a good sign that every thing is well.
Wait until most of that food is gone before adding more. Slowly the worms will be able to eat food faster. Just do not stir uneaten food into the bedding because worms do best with separate areas of food and bedding.
That is all there is to it!
Well the coffee is running down so I guess its time to wrap this one up.
The worms love it when I drink coffee, they get the grounds.
Thanks for reading,
Matthew Wilson
Related posts

Alabama jumper worm identification guide
Alabama Jumpers Alabama Jumpers are great worms that are hard to grow commercially, but do really well in the garden. This post is part of a series on worm…
Will my worms over populate?
I am commonly asked if worms can over populate the worm bin. Worms multiply quickly, but they will...